Luminar Neo for Beginners: Transform Boring Travel Photos into Colorful Images
In this hands-on Luminar Neo for beginners tutorial, I put this easy-to-use and powerful software to the test.
Feeling overwhelmed by the vast world of photo editing? Think you can’t master the art of transforming your pictures into eye-catching visuals?
Luminar Neo may just be your golden ticket. It’s beginner-friendly and designed to help you to create stunning images with ease.
Luminar Neo is a simple photo editing software that’s perfect for beginners who want great results. It also has powerful editing features for more experienced photographers.
In this guide, I’ll walk you through the essentials of Luminar Neo, so you’re ready to edit a stunning landscape, or a gorgeous portrait.
Curious? Get 10% OFF Luminar Neo Pro and explore annual subscriptions with the code BAREFOOT10 here.
Ready to embark on your journey to becoming a photo editing pro? Read on, and let’s dive into the world of Luminar Neo together.
How to Use Luminar Neo for Beginners
The bottom line: I found Luminar Neo really easy to use and intuitive. If you’ve ever used another photo editor, it behaves pretty much the same way. That’s a good thing.
Let’s jump right into it. Before editing my photo, I needed to move it to Luminar Neo from my phone.
One thing I find really annoying is moving photos from my phone to my computer. I use Samsung Link to Windows some of the time, which is honestly a pain, and never seems to work well.
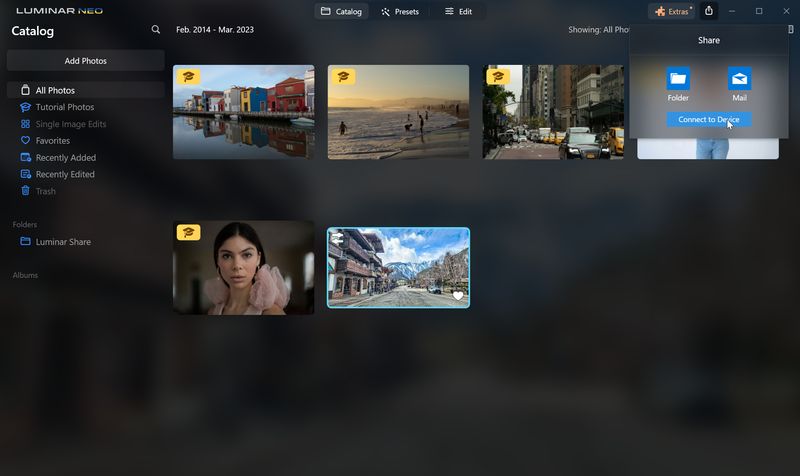
So I decided to try the Luminar Share mobile app. I downloaded the app, made sure my computer and phone were on the same Wi-Fi connection, and used Luminar Share to quickly send a photo to Luminar Neo’s catalog. So easy!
How to use Luminar Share to move a photo to Luminar Neo
Once the app is installed, go to Luminar Neo on your computer, and click the share icon in Luminar Neo (top right corner).
Click Connect to device.
A QR code appears on screen, which you scan with your phone.
From there, just select the image you want to share from your devices media library, and click Send it to Luminar Neo.
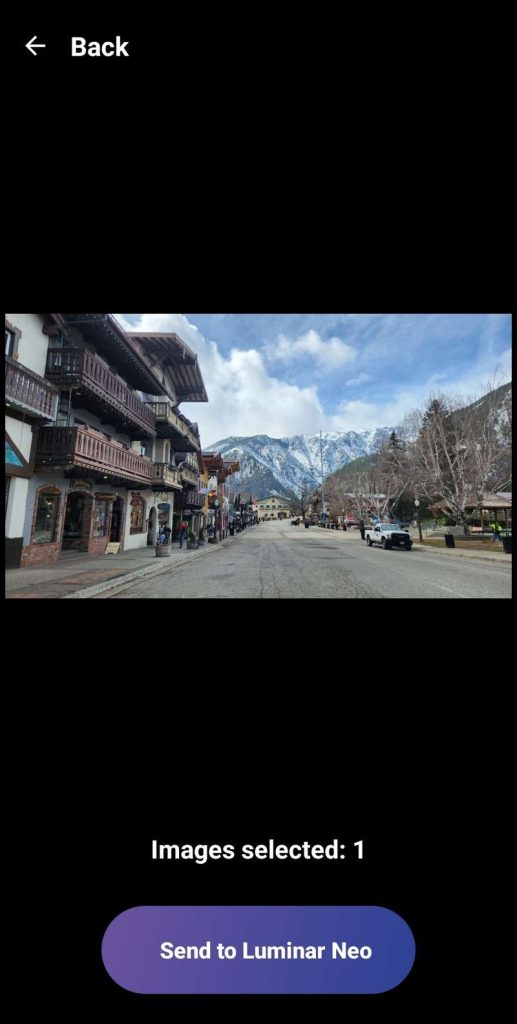
The image then pops up in the Luminar Neo catalog on your computer.
So easy!
Luminar Neo free trial
Want to try it out? There’s a 7 day free trial.
Click here to download the 7 day free trial.
How to edit a landscape photo in Luminar Neo for beginners
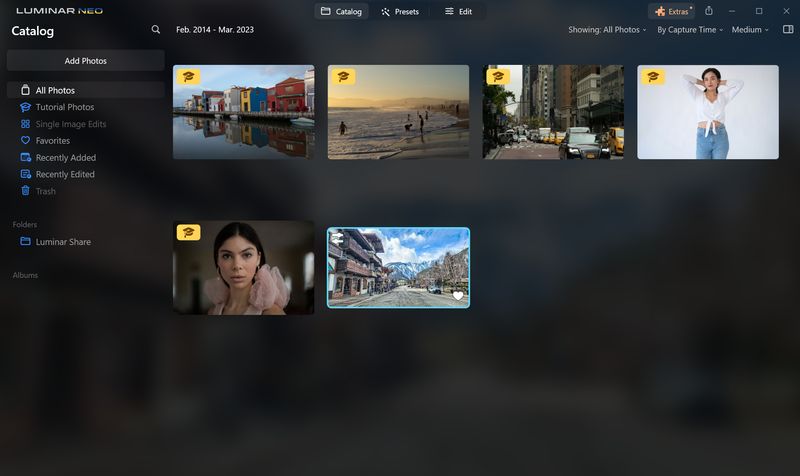
The next step is to open Luminar Neo, and go to the Catalog tab.
In this tutorial, I edit my photo without using Luminar Neo’s Extensions to make it easy for a beginner. There are some insanely cool ones, including AI Noiseless (no more grainy photos!), AI Background Removal (perfect for removing your weird Uncle Bob who’s photobombing you in the background) , and Supersharp (which can make blurry photos in focus again). Scroll down for more on extensions available at the end of the article.
Because I already added my photo from my phone using the Luminar Share app, the photo is now in the Catalog.
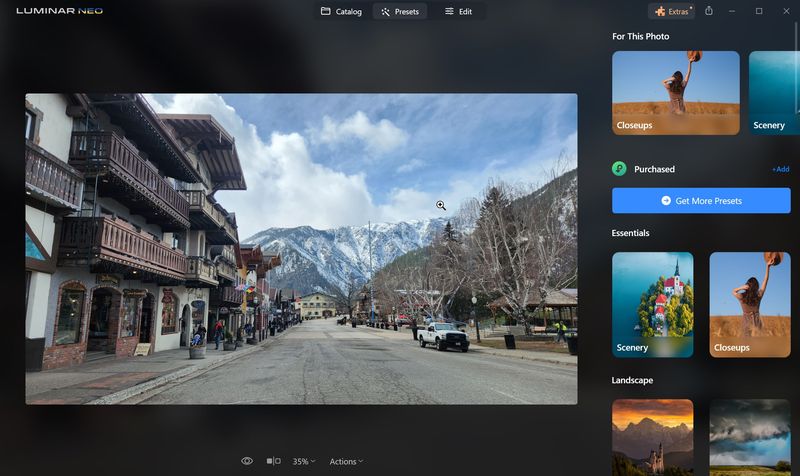
Just select the photo you want to edit, and the click Edit at the top of the screen.
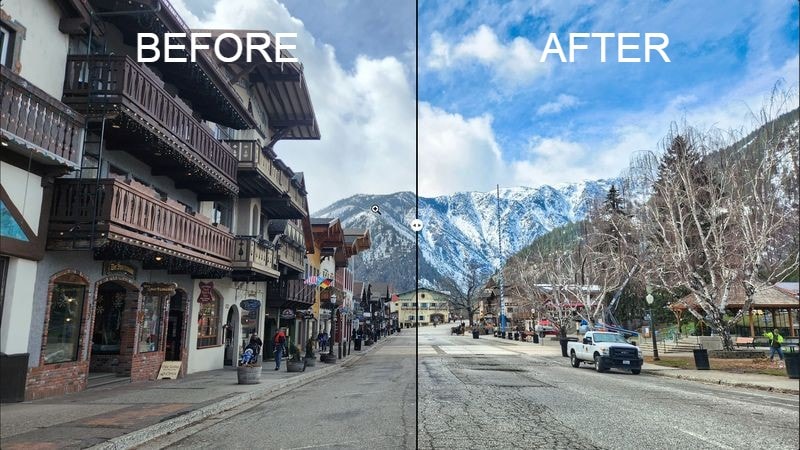
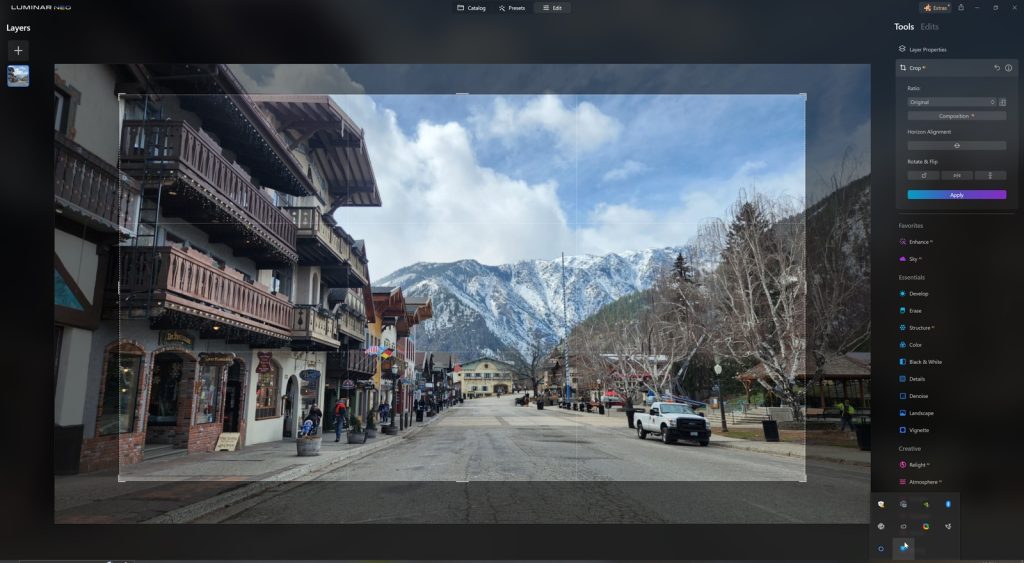
I’m editing a photo of a street shot in Leavenworth, Washington. It’s a .jpg image, though Luminar Neo can edit RAW as well.
Luminar Neo is what’s called a non-destructive photo editor. That just means that it doesn’t destroy, or save over top of, your original photo.
The first thing I always do when editing a photo is to crop out what I don’t want. So to do this, I just go to Tools, select Edit – Crop, and drag the edge of the photo to crop, and click Apply.
If you’re in a hurry, use the Enhance AI tool in the Tool tab, it automatically edits your photo, including adjusting the saturation, and more.
To use Enhance AI, just click Enhance, then adjust the sliders on Accent and Sky Enhancer to the intensity you like. It does a pretty good job, and might be all that you need to edit your photo.
Get 10% OFF Luminar Neo Pro and explore annual subscriptions with the code BAREFOOT10 here.
But, I want to show you a few more beginner features, so I’ll start with some simple edits.
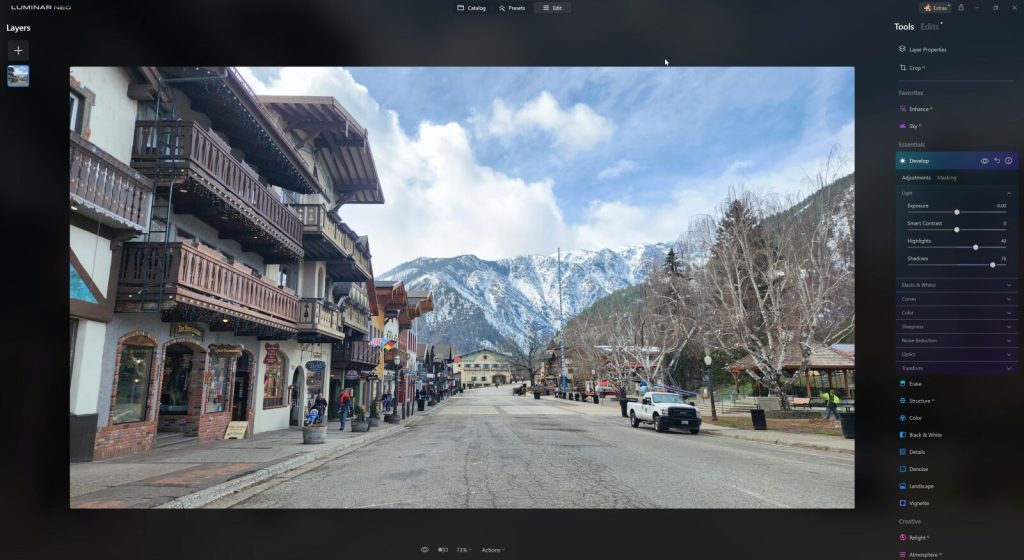
I feel the image looks a bit dark and flat in the buildings, so I’m going to make some basic edits to Highlights and Shadows in Develop.
I click on Develop, and just drag the Highlights and Shadows slider to make the buildings a bit lighter, and remove some of the shadow. Notice this washes out the sky a bit, but don’t worry about that, as there’s a super easy way to fix it.
Actually, the whole image could use a boost of color, so let’s click Color in Essentials.
From there, I use the slider to up the Vibrance.
Tip! Saturation impacts the intensity and enhances every color in an image. Vibrance is more specific, and it saturates the parts of a photo that aren’t that colorful.
Looking at the photo, it’s not as sharp as I’d like.
I’m going to use the Structure AI tool here. It’s a good choice, because it enhances image texture and detail. It’s great for landscape photos, because it enhances buildings, mountains and rocks, but it won’t really impact skin tones or other details.
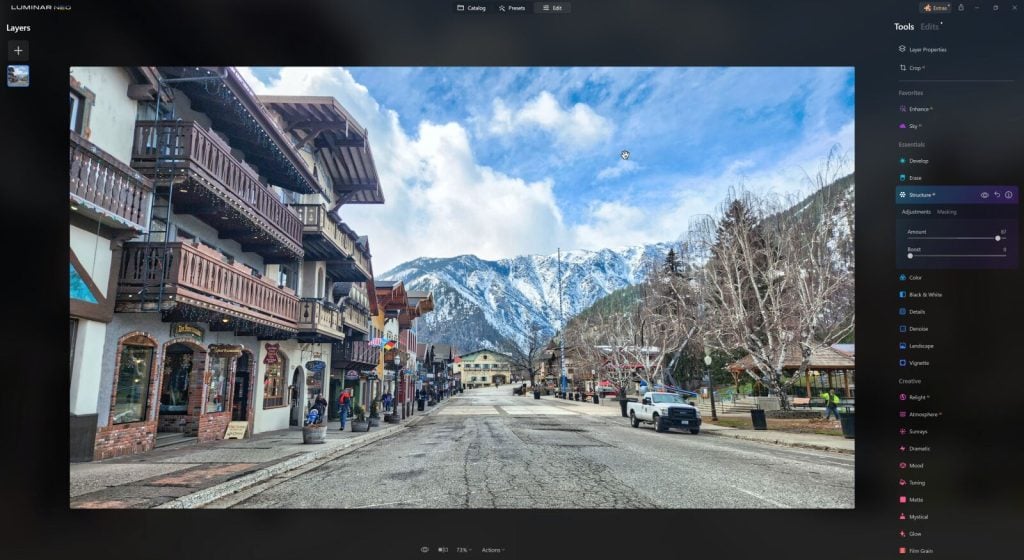
That’s a lot better.
Tip! Structure AI vs the Details slider. I like to use Structure AI, because it doesn’t globally affect all elements in the photo, including skin in portraits, while the Details adjustment globally sharpens edges, which can make skin look a bit weird.
But I have to say all of those adjustments have made the sky look a bit off.
I’m going to play around a bit with the Sky AI Essentials to see if I can make the sky a bit more … dramatic.
Click Sky AI, then click the Sky Selection drop down.
There’s a lot to choose from here.
Just for fun, let’s choose a night sky.
Oh, that’s pretty cool.

Let’s try another – a dramatic sunset.

Also cool. But I’m going to stick with my original sky.
So I’ll click the Reset tool (in the Sky tool) to get rid of my changes to the sky. You can also go to the Edits tab to remove your edits to this point, but this is quicker.
Tip! To delete more major edits, just click on the Edits tab, click Discard Edits, and start fresh. Important: The software keeps track of your edits, allowing you to go back and adjust them. However, reopening a tool undoes all subsequent edits, which can be confusing for beginners.
To finish, I’m just going to go to Enhance AI, and punch up the Sky Enhancer a bit.
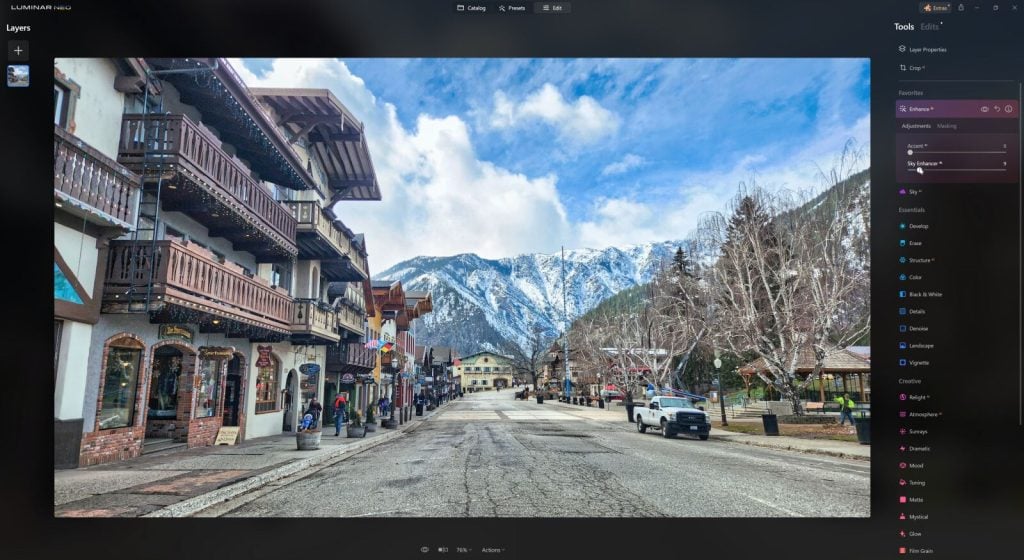
And done.
It’s that easy.
I want to compare my edits to the original, so I click the Compare button on the bottom of the screen. This shows the image before and after edits. You can grab the slider in the middle in Luminar Neo to show more or less of the edits. Very cool.
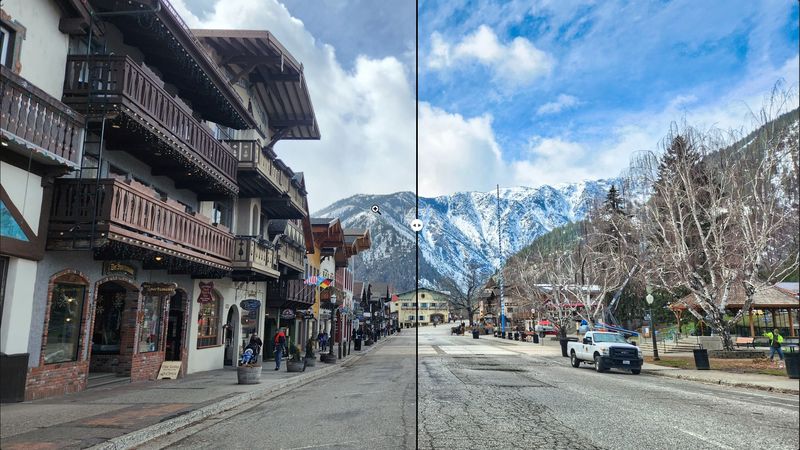
You can also click the little Eye icon on the bottom to toggle between edited and unedited versions of your photo.
Read more great articles like this:
- Using A Cell Phone In Europe Made Easy and Affordable
- Flytographer Review: Our Hometown Photo Shoot
- 25+ Best Travel Memories Quotes to Inspire Your Wanderlust
How to save your photo in Luminar Neo
So, how do I save my photo?
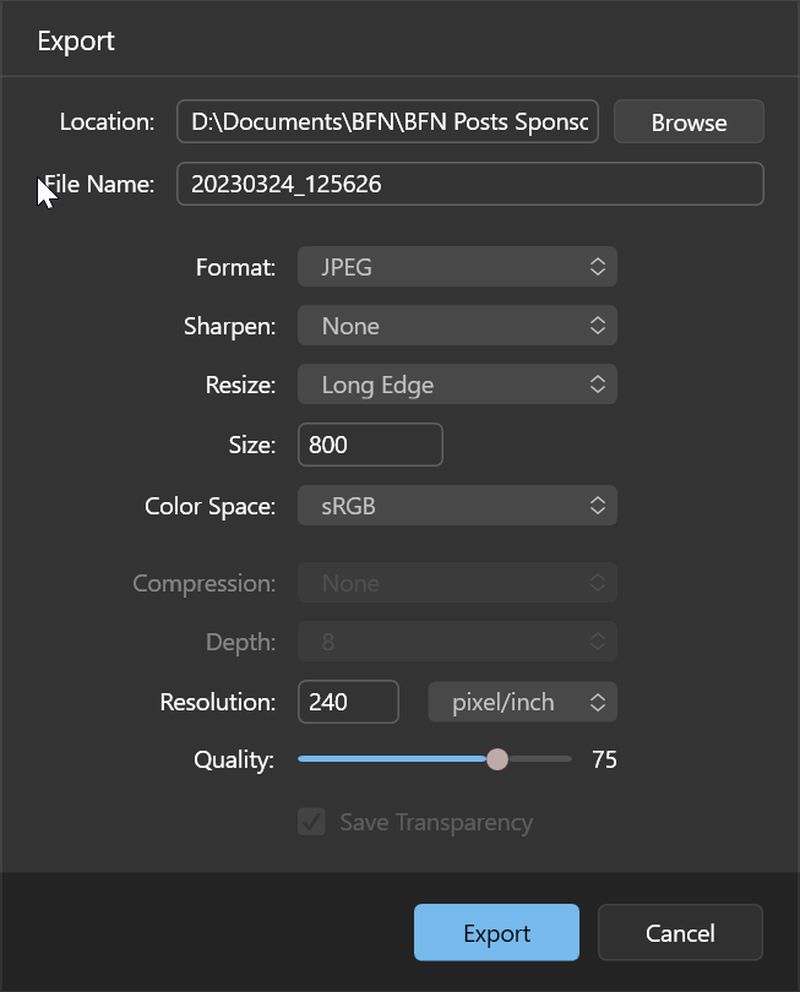
Just click the Share icon on the top right, and click Folder to save to your computer. You can also click Mail to email the photo.
If you click Folder, the Export box pops up. You can select the folder you want to save to. From there, change the format, adjust the quality, and even change the photo’s size.
What are Luminar Neo Extensions?
Luminar Neo has some very cool extensions available. The extensions are included in the Pro and Lifetime plans, but not the most basic Explore plan (more on that below). Here are some of what I think are the best extensions available.
- AI Noiseless (no more grainy photos!)
- AI Background Removal (for removing ugly backgrounds)
- AI Upscale (for improving a print quality version of a pixilated photo)
- AI Magic Light
- HDR Merge
- Supersharp (for motion blur and misfocus)
- Focus Stacking (more advanced, and for stacking up to 100 photos to create sharp details and improve depth of field)
- Relight AI
How much does Luminar Neo cost?
There are three Luminar Neo Plans: Explore, Pro and Lifetime.
Here’s what they cost, at the time of writing:
- Explore $11.84 USD/month (billed monthly) or $142 per year
- Pro $94 USD/first year
- Lifetime $177 USD one-time
The Explore plan gives you access to the photo editor, any upgrades and updates in the software, plus a 5% discount on Marketplace items (Skies, Presets, LUTs, Overlays, etc.)
The Pro plan gives you all you get in the Explore plan, plus access to existing Pro-level extensions, including AI-based tools for sharpening, upscaling, noise reduction, focus stacking, merging HDR images, background removal, light manipulation. You can also use Luminar Neo on two devices (instead of one) . You also get a 10% discount on Marketplace items (Skies, Presets, LUTs, Overlays. etc.)
The Lifetime plan gives you access to everything the Explore plan has, including access to all existing Pro-level extensions, PLUS access to future extensions. Extensions include AI-based tools for sharpening, upscaling, noise reduction, focus stacking, merging HDR images, background removal, and light manipulation). You can also use Luminar Neo on two devices (instead of only one allowed on the Explore Plan), and you get a 10% discount on Marketplace items (Skies, Presets, LUTs, Overlays, etc.)
Luminar Neo vs Luminar AI
The answer here is simple. Luminar AI no longer exists as a separate program in 2023.
Luminar AI was discontinued in October, 2022, with its existing AI features, and more, rolled into Luminar Neo.
In the new 2023 Luminar Neo, the AI tools are rolled into the photo editor itself, while other AI features are in the extensions. There are new AI extensions added all the time!
Luminar Neo discount code
Looking for a coupon for Luminar Neo?
Get 10% OFF Luminar Neo Pro and explore annual subscriptions with the code BAREFOOT10 here.